Posts

Showing posts from April, 2023

1943 Battle of Voronezh

Image
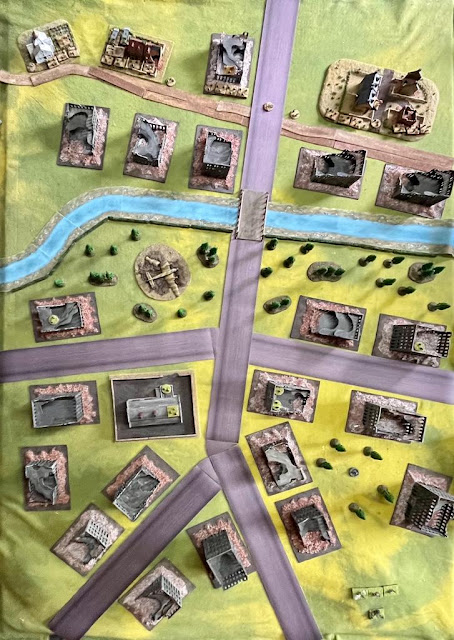
Deployment: For this game we are refighting part of the 1943 battle of Voronezh. Soviet forces have taken the city east of the river, but must now push across to claim the west bank. They are aided by the river being frozen, making it passable though dangerous for infantry to cross. The germans have a company north of the bridge, another one south of it and a third in reserve. The soviets have one company south of the bridge and two north, with a fourth company ready to advance from the bridge once it is cleared.  Turn 1: The soviets deploy five platoons to occupy the buildings on the east bank. The germans push forward patrols to keep an eye on the bridge whilst deploying a platoon with an attached machine gun to anchor their southern flank.  Turn 2: Advancing from the safety of the buildings, soviet forces all along the line reach the eastern bank. The confident commander deploys a platoon onto the bridge whilst in the far south another platoon makes a dash over the ice, covered by d

Carolingians Vs Byzantines

Image
Deployment: The byzantine line stretches from the field on the left to the gentle hill on the right. Bow armed warriors hold the hill, whilst levy javelinmen shelter in the field. Between them are levy slingers with the tagmatic mounted hearthguard in reserve. A steep hill dominates the carolingian deployment. To its left and right they have a unit of warriors and bowmen. In the centre they have another weak unit of warriors, whilst ready to swing out on the far right they have an extra strong unit of mounted hearthguard.*  Byzantine Turn 1: The levy and hearthguard advance, but the slingers salvo is to no avail as the carolingian warriors raise their shields and weather the storm using the Defensor ability.  Carolingian Turn 1: With shields still raised the warriors advance. The bowmen take possession of the hill and give the byzantine hearthguard a volley using Vinco , and down two of them. The carolingians own hearthguard race ahead to threaten the byzantine flank. Byzantine Turn 2

Imperial Guard Vs Orks

Image
Deployment: The Imperial guard have an infantry platoon and command squad clustered around the fountain. The archive acts as a bastion in the centre of their line, garrisoned by the missile launcher squad and the veterans. Slightly ahead and floating on their left flank they have another command squad and the flamer squad.  Ork Turn 1: The horde surges forward. Top left the shooter boyz and killa kan advance, concealed by the capitol building. In the centre two mobz of slugga boyz march boldly in the open straight towards the enemy lines. Bottom right the burna boyz move slowly through the factory, whilst in the far corner the warbuggy races ahead, ready to immolate some guardsmen. Imperial Guard Turn 1: The missile launchers, veterans, and combined mortars of the infantry platoon all rain down fire on the slugga boyz, ripping apart most of the first wave.  Ork Turn 2: The warbuggy darts forward, but it's deadly skorcha is just out of range. The rest of the warband continues to adv