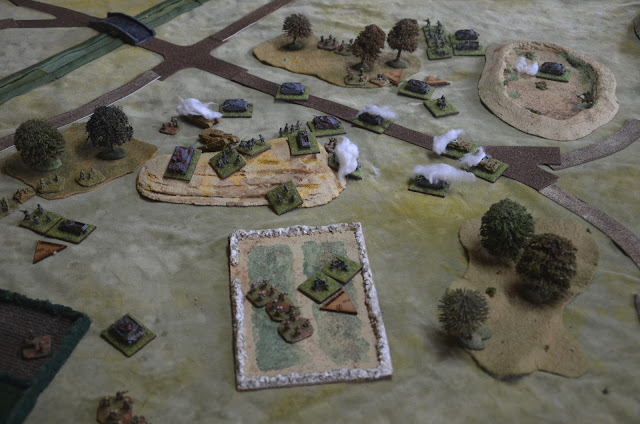
Tunisia - March 1943
Turn 1: The Germans are counterattacking in Tunisia. A panzer battalion with attached panzer grenadiers sweeps forward on the right and captures a vital hill overlooking the road with no opposition.
Turn 2: The reconnaissance armoured cars boldly dash up the road, uncovering but being rapidly overwhelmed by a company of churchill tanks hull down on the central hill, alongside a 6lb anti tank gun.
Turn 3: With the enemies location confirmed, the second battalion of panzer grenadiers advance towards the centre. The panzers continue their swing around to the right.
Turn 4: A reconnaissance section scouts the treeline ahead of the panzers, uncovering a British infantry company. The bulk of the panzers dip into the gulley towards the enemy tanks.
Turn 5: The two battalions surge forwards towards the central hill in a synchronised attack, and at the same moment the British reveal their reserve on the reverse slope and a whole second battalion in the hedges and woods on the left.
Turn 6: The churchill's slam round after round of deadly 6lb fire into the advancing panzers, eliminating one platoon even as the rest race around their flanks. The infantry on the hill counter attack down the slopes and take a mauling from the panzer grenadiers. Meanwhile the second battalion swings out of the hedgerows and gives the tiger platoon an ineffective volley from their anti tank rifles.
Turn 7: The panzer III's finally get some good flanking shots in, annihilating one platoon of churchill's and forcing the rest of the company to pull back from the ridgeline. The German regimental commander is left behind and dangerously exposed, but repels an assault by a British infantry platoon sallying out from the woods. The tiger's and panzergrenadier's push forwards to successfully capture the central hill, but their left flank is dangerously exposed as the British press on from the hedges.
Turn 8: The German heavy machineguns are overrun by the second British battalion, leaving the panzergrenadier's on the hill with no safe line of retreat. On the left the limbered 6lb is saved from close assaulting panzergrenadier's by timely mortar fire, whilst on the right the British company in the woods slowly begins to crumble. In the centre the churchill's absorb a punishing amount of fire, but dish out plenty in return neutralising a whole company of panzer III's.
Turn 9: The panzergrenadier's and tiger's push on from the hill, desperate to exploit their precarious breakthrough. But in the process they lose what little cohesion they have left and fail a morale check, forcing them to flee from the advancing British. The few remaining panzer III's in the centre are swept up in the confusion and finished off.
Turn 10: Just as the British recapture the hill; the company in the woods finally breaks. The 1st battalion with attached churchill's is forced to pull back and regroup.
Turn 11: What's left of the panzer battalion pushes forwards, with the over eager regimental commander boldly racing forwards to claim the bridge. Unfortunately most of the regiments vehicles are smouldering wrecks on the field and the men are streaming back to their start lines. With only 1 of the 5 objectives decisively wrested from British control and tied on losses of a battalion each, the British win!
* This was our first ever game of spearhead, no doubt with several rules mistakes made. Looking at the stats we decided the theatre appropriate churchill III's were a bit unfairly undergunned and underarmoured, so used churchill VII's instead. The outcome was somewhat an inversion of a more typical late war scenario with plentiful German medium panzer's on the attack struggling against a handful of powerful and heavily armoured British tanks.


Comments
Post a Comment